

Outline
The main purpose of this game is showing and watching machines made out of blocks.
Some of the game-modes allow you to battle or race against other players. (testing phase)
You can create your original machine with ease by reassembling those machines that are distributed,
or by using the automatic control block.
At first, Let's start with remodeling the duplicate sample.
You should refer to published machine after becoming familiar with this game.
Switch to ExpertMode in that time, and see Manual2.
Words
core[block]
This block is handled as the center of the machine, must be equipped with one.
Gaze of camera can be changed by scope parts.
And core is criteria for measuring absolute altitude.
chassis[block]
Blocks that can be shaped, and most often used.
Charge and store energy.
Capacity and weight is proportional to the volume.
parts[block]
Blocks with a variety of functions.
Generally operation setting is required.
The weight of all parts is the same as the raw chassis.
body
Refers to the chunk of the blocks.
Joints and pistons can change their shape(pose).
CoreBody means body that including core parts, and corresponds to the torso of the robot.
modifier[key]
Key that is used in conjunction with other keys. (default: Alt)
ex. MoveKeys: normal speed, Modifier+MoveKeys: 4x speed
GUI

BUTTON Press and various processing is executed.
TOGGLE Each press switches ON/OFF.
SLIDER Move the knob to adjust the parameters.
*One step decrease (increase) by the camera left key (right) *10steps with modifier
*Position of the knob is inverted by the camera up key
*Knob will move to the center by the camera down key
*To set the special parameters (maximum value + 1) to the joint parts, etc. you need to use the right arrow button
or the camera right key
LIST Press and several choices is displayed.
INPUT Enter the letters of the name, etc.
Menu

This is a menu that leads to each scene of the game.
UserName Enter your user name *max 16 characters
MachineName Enter your machine name *max 16 characters
Comment Enter a description of the machine *not required
DisplayMachine Display the machine in the middle
CREATE Create a new machine.
COPY Replicate the machine being edited.
DELETE Delete the machine being edited.
LOAD Load the machine that stored in data folder.
OPTION Configure the settings about screen, sound, control, etc.
QUIT Quit the game.
ASSIGN Register the action (Operation of the machine), and assigns it a key or button.
BUILD Assembly and operation setting of the machine.
PLAY Play with other players online.
PRACTICE Commissioning of the machine offline.
CONSTRUCT Creates a part or whole of the stages. *Can be load online
HOST Prepare the room for online play.
*Machine being edited is automatically saved when the scene is switched

if you have a lot of machine data, appears like this by pressing the LOAD button.
Yellow items are folder, and white items are file.
Subfolder in the initial state is only Samples, but you can add as you like.
Machine data can be put in a subfolder directly under UserData *Folders that start with the name '_' are invalid
'Machine data' refer to the two files (*.mcad & *.mcbd)
mcad: MachineCraftAssignData
mcbd: MachineCraftBuildData
Assign
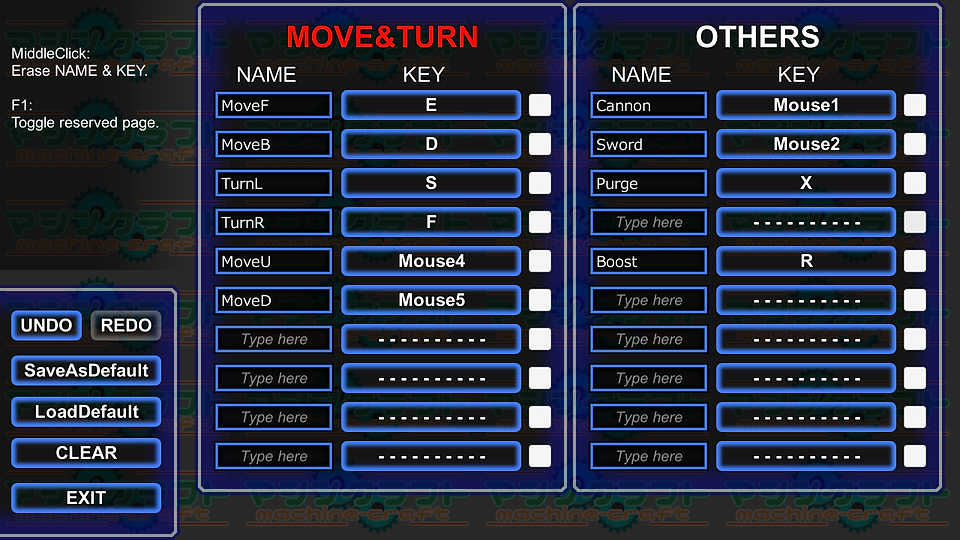
Register the action, and assign the key.
Action means the behavior of the machine, such as "forward", "fire".
For example, if you set the "MoveF " to the thruster that is attached to the rear machine, it moves forward in the E key.
MOVE&TURN It is a group of actions related to movement and rotation.
These 10 pieces, will trigger a common action (MOVE&TURN) In addition to the own action.
Specifically, you can use the operation setting such as "brake release Once you execute the MOVE&TURN action".
NAME Enter the name of the action in the keyboard. *delete it by clicking the middle button
KEY Screen turns to black by clicking, and the pressed key will be assigned. *delete it by clicking the middle button
toggle(white square) It allows you to switch the ON / OFF of action each time you press.
*it is usually set to ON only while pressing.
UNDO Rewind one operation.
REDO Redo the operation that was rewinded.
SaveAsDefault Save the current state as a standard setting.
LoadDefault Load the setting of the standard action and key assignment.
CLEAR Erase all of the action name and key assignment.
EXIT Save and return to the Menu or Build.
*You can traverse the Build and Assign directly
Build

You can use a variety of functions by SystemMenuKey (default: Tab)
Appears the number of major blocks and weight of the machine at the right end.
You can select the edit mode with five buttons at the upper end, but it is more convenient to switch in the 1-5 key.
Must be used in conjunction with mouse and keyboard, assignment of the major keys can be changed by OPTION.
You can check the assignment by pressing the F1 key, while editing or driving.
FORM Shape the machine by adding / deleting the blocks.
SCULPT Shape the machine by sculpting the chassis blocks.
PAINT Paint the blocks.
SETUP Set the action and parameters to the blocks.
GROUP Group the blocks, and will no longer connect to adjacent blocks.
SoundType Select the sound effects of machine.
SetStartingPoint Save the current position of the camera, and then restored when the next start.
ImportMachine Load and add another machine.
HardJoint Enable error correction of joints. Improves the stability of high speed rotating tires and propellers.
UNDO Rewind one operation.
REDO Redo the operation that was rewinded.
L/R Change the direction of FLIP & MIRROR to left and right.
F/B Change the direction of FLIP & MIRROR to front and back.
U/D Change the direction of FLIP & MIRROR to botton and top.
FLIP Flip side right(front, botton) and left(back, top).
MIRROR Duplicate half of the right (front, bottom) to left (back, top).
CLEAR Erase all blocks.
TurnL Rotate the entire block in the counterclockwise.
TurnR Rotate the entire block in the clockwise.
ASSIGN Move to action and key assignment scene.
CHECK Blink separated blocks slowly.
TEST Test the machine operation.
EXIT Return to Menu.
*UNDO and REDO is possible till loading the next machine.
*Error parts will blink automatically by opening the system menu

FORM mode (shortcut: 1), you can assemble the machine by connecting the block each other.
In addition to the chassis block, there are many parts blocks that has functions.
Place the same block as the one that appears in the top right corner in the left-click, and then removed by the right-click.
*Those operations are repeatable
When you middle-click the block, block in the upper right corner will be changed.
If you want to place an unused block, It can be selected from the list by pressing the block panel key(default:Q).
Core It is center of the machine, and gaze point of the camera. *There is a need to always be one equipped
Chassis In the underlying block of modeling, and able to change the shape by sculpting.
Energy capacity will increase, depending on their volume.
*For other blocks, refer to the Parts
You can move 1m the entire machine to direction of sight by pressing slide key(default:B).
*Direction is limited to one of the XYZ axes
If any block is focused, move the only part that connected to the block.
When you slide by holding down the modifier key, only the portion distant from the focused block is the subject.
*The machine increase durability in accordance with the weight
*XYZ coordinate is displayed in the lower left

SCULPT mode (shortcut: 2), you can shape by cutting the corner of the chassis block.
You can rise nearest edge to the cursor with the left click and cut with right click.
These operations are repeatable.

Editing mode changes each time you press the 2 key.
Single mode is usually enough, but neighbor mode is sometimes better.
*The sculpted blocks lose energy capacity and endurance, but the shape of the collision judgment remains of the cube.
*When cut into a form that is not in contact with adjacent block enough, it will not be connected each other.
*When all edge(four vertices) of the block are cut, It will become pyramid.

PAINT mode (shortcut: 3), You can paint blocks.
Large square of the upper right shows the current color.
Left small square shows the color of the glowing adjunct (jet, crystal, etc.).
*It is determined automatically based on the difference of RedGreenBlue.
LeftClick: Paint one block. *repeatable
RightClick : Paint all blocks that have same type and color at one time.
*When you hold down the modifier key, only a single body becomes the target
MiddleClick : Capture the color of the block.
Use the block panel key(default:Q) to open and close the color creating window.
TRANS Makes current color semi-transparent. *trans000 is invisible *Not apply to some kind of blocks
EMIT Make current color self-luminous. *Chassis blocks only
Red Adjust the red component of the color.
Green Adjust the green component of the color.
Blue Adjust the blue component of the color.
LOAD Load the image for color extraction.
※Blocks painted in transparent is not visible at the time of drive, and it will not collide.
※The weight of the semi-transparent block is 50%, and the weight of the transparent block is 10 %.

GROUP mode (shortcut: 5) , You can divide blocks into several groups.
If usually the adjacent block is in contact with the plane, integrated block group will be one body.
When you connect the body to each other in the Joint or Piston, they can be posing.
If you prevent the adjacent body stick, It can be resolved by separating group.
Group0~6 Seven groups that are color-coded for identification.
Dummy0~6 Same as each group. But will prevent the collision and is treated as a dummy that lost the function of block.
You can use in order to avoid a collision between blocks.
Mockup Dummy with collision, It will connect to all without distinction of group.
Usually you set the Dummy or Mockup to parts for decoration, because they are not count as parts.
LeftClick : Paint a block(=Set the group). *repeatable
RightClick : Paint a body.(=Set the group and keep dummy state)
Modifier+RightClick : Paint the adjacent block that has same color. *Dummy state will be changed
MiddleClick : Pick up group ID from focused block.
*Joints and Pistons are not have group, and they will connect the body to each other without distinction of group.

SETUP mode (shortcut: 4), You can set the operations of parts.
Left-click any parts and appears action settings panel.
The panel contains 8 sections of action and parameter.
When you press the action button, list will be displayed on the left, and you can select the action.
If you select the action, slider will be displayed below the button, and you can set the parameters.
In this example, 2 actions are set to blue AntiGravityDevice.
Action1 : NEUTRAL(no action executing) : Generate a thrust in the opposite direction of gravity in the output 24.
Action2 : MoveD(down action executing) : Set output 0 and fall free.
※Since this machine to stop when left in the air, setting is a bit special
The meaning of the parameters depending on the type of parts are different. (angle of joint, size of tire, etc...)
To learn how to configure parts, you should modify the sample and test it many times.
MoveF~Boost These are actions that was registered in Assign. *Differ for each machine *Unregistered slot is empty
- - - - - - - - No action
NEUTRAL Default action when no action is executing.
It becomes only the constantly same behavior if you set only NEUTRAL.
MOVE&TURN This is a shared action in the case of any MOVE&TURN action is executed.
*Operation setting is cut when you middle-click the configured action button. *Paste if it is blank
*Rather than select the "no action" from the action list, it is easier to cut (erase).
*Parameters are averaging when it perform multiple actions at the same time.

You can copy and paste action setting in between the same type of parts.
MiddleClick : Copy
LeftClick : Paste *repeatable
RightClick : Cancel
*You can hide chassis blocks with modifier + 4 key.
Practice(Test)

Commissioning of the machine.
Operate each parts by pressing the key that you assigned the action, and you can drive the machine.
USAGE Showing how to operate (Action & key assign).
INFO Display the center of gravity guide and collision marker.
EXIT Return to the menu (Build if in Test).
WORLD Choose the type of world.
AREA Select the area restriction. *Usually Free
CAMERA Change the movement type of the camera. *Usually Dislink
MaxAttacks The maximum number of attack at one time. *Usually 16
Charge Energy charge speed. *Usually 100 or 999
Damage Damage magnification *Usually 0 or 100
LoadEnemy Load enemy machine.
ResetBoxes Relocate the containers.
NumAttacks Current number of attacks *Launcher is counted twice
UnfoldedSize Current machine size.
numbers in lower right Absolute height of the core Altitude specified by Mover Airspeed
*F1 : Change sky. (day/night, exclude space)
*F2 : Put a bomb.
*F3 : Put a ball.
*F5 : Drive enemy machine. *toggle
*F8 : Reset all joints.
*Modifier+F8 : Respawn
*F9 : Fix the machine. *LockAngleKey(default: G) detach camera from machine
Play

Choose the room to join.
Contents of the room configuration is displayed by Focusing the button, and you can join by pressing it.
PASSWORD The password to enter the room. *Usually blank
EXIT Return to Menu
<Setting of the room>
GAME Game mode
WORLD World type
SKY Sky type
AREA Area restriction
BREAK Machine destruction mode
SpeedLimit Will be decelerated to exceed this speed
MaxAttacks Maximum number of attacks at one time
DamageC The given damage magnification of Cannon
DamageS The given damage magnification of Sword
DamageL The given damage magnification of Launcher
VehicleDmg The damage magnification of the vehicle
Charge Energy charge speed magnification
<Limited by the room (regulation)>
MinWeight Minimum weight *Limit the lightweight high-speed machine mainly in race
MaxWeight Maximum weight *Limit large machine mainly in combat
MaxBodies Maximum number of body *Limit the articulated machine of large processing load
SizeLimit The size in garage (width, height, depth)
Thruster~Mover Maximum number of each parts
CCU(ConCurrentUsers) Number of players in entire server. (current / max)
*You can not enter the room, if version or password is unmatch.
*You can not enter the packed room.
*The relevant items are displayed in red if the machine does not meet the limit, and you can not enter the room.